Hi there. I stumbled across this problem where my Canon IP4500 printer wouldnt print anything at all, when i came to print something out it was telling me: "Printer output tray is closed please open tray and printing will resume".
This problem is caused by a broken piece of plastic which would normal press the micro-switch that is pressed when the output tray is open. To fix this follow my step by step guide.
Step 1: You will need 3 tools for this job, Small eletrical screwdriver, wire cutters and eletrical tape or solderer.
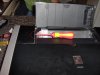
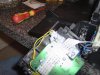
Step 2: See picture 2, One the side where the power switch is located, using a small electrical screwdriver, carefully lift and slide the small plastic panel into the middle of the printer. Place to one side.
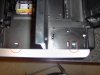
Step 3: See picture 3, As your looking down onto the top of the printer, where circled in picture 3 press and push away from the printer and that part of the silver casing will slightly come away.
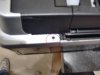
Step 4: See picture 4, Turn printer upside down, where circled in picture 4 you need to lift the plastic casing with a small electrical screwdriver and push away from the printer again the silver casing will come away and you will be able to carefully take the whole of that silver side away.
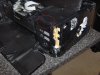
Step 5: See picture 5, This bit is a little tricky now. Where circled in picture 5 get your screwdriver again and under the little plastic lip just above the paper feed button lift and bring forward (two handed job really)to release the two pins. Be very carefull this point not to break anything. Once that front panel comes forward carefully wiggle and lift up, do not pull. Then it will come away.
Step 6: See picture 6, Your now looking at the back of that panel. Towards the bottom of the circuit board you will see two yellow wires going to a switch, (this is the important bit, this will make the printer think that the output tray is always open, thus solving the problem) cut, yes cut, both wires, remove plastic covering/shething exposing the wire. Join the two wires together, you can do with by either just twisting them together and taping up with electrical tape or solder it up, your choice.
Step 7: Yes the final step guys n gals, time to put your printer back together, do this step by step guide in reverse.
This 100% works on my printer and should work fine if you have the same problem.
Lemme know what you think of this guide.
Thanks
This problem is caused by a broken piece of plastic which would normal press the micro-switch that is pressed when the output tray is open. To fix this follow my step by step guide.
Step 1: You will need 3 tools for this job, Small eletrical screwdriver, wire cutters and eletrical tape or solderer.
Step 2: See picture 2, One the side where the power switch is located, using a small electrical screwdriver, carefully lift and slide the small plastic panel into the middle of the printer. Place to one side.
Step 3: See picture 3, As your looking down onto the top of the printer, where circled in picture 3 press and push away from the printer and that part of the silver casing will slightly come away.
Step 4: See picture 4, Turn printer upside down, where circled in picture 4 you need to lift the plastic casing with a small electrical screwdriver and push away from the printer again the silver casing will come away and you will be able to carefully take the whole of that silver side away.
Step 5: See picture 5, This bit is a little tricky now. Where circled in picture 5 get your screwdriver again and under the little plastic lip just above the paper feed button lift and bring forward (two handed job really)to release the two pins. Be very carefull this point not to break anything. Once that front panel comes forward carefully wiggle and lift up, do not pull. Then it will come away.
Step 6: See picture 6, Your now looking at the back of that panel. Towards the bottom of the circuit board you will see two yellow wires going to a switch, (this is the important bit, this will make the printer think that the output tray is always open, thus solving the problem) cut, yes cut, both wires, remove plastic covering/shething exposing the wire. Join the two wires together, you can do with by either just twisting them together and taping up with electrical tape or solder it up, your choice.
Step 7: Yes the final step guys n gals, time to put your printer back together, do this step by step guide in reverse.
This 100% works on my printer and should work fine if you have the same problem.
Lemme know what you think of this guide.
Thanks