Bizhub C350 - Printing quality problem - Gaussian blur and fade out

Joined
Jun 11, 2020
Messages
16
Hi there!

I just bought a used/older laser printer - Konica Minolta Bizhub C350.
Its working but I got some printing quality problems.:
In places where the lines, pictures or text are thick, dark, dense or crossing each other the printer make some… gaussian blur like spots/smudges. And also on the opposite, where the printed elements are thinner or pale, some parts are faded out completely. Printing a file or scan/copying something yield the same result.

I got a guess what causing it but for sure, I ask you opinion.
 

Attachments

  • IMG_20200608_222429.jpg
    IMG_20200608_222429.jpg
    122.9 KB · Views: 114
  • IMG_20200608_222516.jpg
    IMG_20200608_222516.jpg
    117.2 KB · Views: 117
  • IMG_20200608_222746.jpg
    IMG_20200608_222746.jpg
    202.6 KB · Views: 195
  • IMG_20200611_234150.jpg
    IMG_20200611_234150.jpg
    114 KB · Views: 114
  • IMG_20200611_234236.jpg
    IMG_20200611_234236.jpg
    117.3 KB · Views: 116
Last edited:
Joined
Jun 11, 2020
Messages
16
Here are more samples.
Meantime I managed to set up the scanner, printed a Printer Test Page, scanned/copied a picture and also I made a custom test page with different line thicknesses/sizes, with different transparency and with the primary colors. It seems to me that the objects size and transparency has to be very specific, otherwise the quality is poor. It applies to all colors in same way.
The printer started his “career” 04.04.2006, accordingly the service log book. By the way the log book is pretty plain. The only useful information (at least for me) is the list of changed/repaired parts, but there is no dates listed.
The last part was HD-501, an hard disk, according the service manual.
As a start I watched a video from an Italian YT channel (viandant5) about common print quality issues. It was very helpful but sadly none of the examples are similar to my issue.
 

Attachments

  • Custom Test page - original.pdf
    36.3 KB · Views: 98
  • Custom Test page - printed in color.pdf
    134.2 KB · Views: 101
  • Picture scan - copied.pdf
    467.2 KB · Views: 90
  • Custom Test page - printed in monochrome.pdf
    124.8 KB · Views: 86
  • Picture scan - original.pdf
    649.9 KB · Views: 100
  • Printer test page.pdf
    901.3 KB · Views: 100
  • Service log book.jpg
    Service log book.jpg
    104.2 KB · Views: 88
Joined
Jun 11, 2020
Messages
16
Some news
I got some denatured ethyl alcohol so I attended to the cleaning of the transfer belt… but I got another issue. I can’t get out the transfer belt unit because replacing procedure for the transfer belt does not make any sense. The manual is showing something else on the picture compared to what I see in the unit.
Also I found two versions (so far) of this manual but neither of them make sense.
1. I removed the imagine units, as written – no problem.
2. Removed the waste toner bottle – also no problem.
3. Removed the two screws on the sides of the belt unit – also no problem
But as the next step there should be some release lock which I don’t see anywhere. (Compare the pictures)
Other things:
I checked the Unit life indicator (see the picture). I don’t know how seriously I should take indicator, in simpler machineries this kind of statistics can be fooled/resented/altered but I don’t know does it works in this devices.
Accordingly to the service manuals I found 3 “typical faulty image” examples which are similar to my case, on pages 4-60, 4-80 and 4-97.
The 4-60 mentions scanner/copier parts/issues, and because my problem affects printing also I exclude those solutions.
The 4-80 mentions LED assy and imaging unit.
The 4-97 mentions fusing unit relates problems. Fiddled with the fuse speed, either increasing or decreasing it but made no difference.

By the way, changing the transfer belt unit would be a costly operation. In our country it goes around 450-400 euros, from china around 200 and if I want to change just the belt maybe around 70 euros. Which opens questions for me: Are the OPC inside the printer interchangeable? (Cyan with magenta or black for example…) Which parameters should I check for compatibility at transfer belts and OPC drums? Dimension of course matter but for example, is this belt spare part compatible with my C350? According to this page C350, C351 and C450 uses the same unit with the same belt I guess.
In a matter of laser printer I am a newbie, but I got some experience in repairing other electronic and mechanical things. Based on my experiences and the basic understanding about how the laser printers work I got some conjecture.
I got no references to this blur issue but it resembles something which I imagine that can happen with magnetic fields and electric charges. The blur either appears between dense/thick/intense objects (like between letters) or around thick/dense/intense object which haves no white spaces inside. Because that, I guess whatever causes it, it is related to electrical charges/magnetic fields and the ability to hold them. It is like the problematic parts ability of holding the charge is decreased and because of that the charge flows/jumps away of the basic area, pulling some toner particles along with them.
Is there any option where the voltage/charge level can be adjusted of some parts? I would like to fiddle with it.
 

Attachments

  • IMG_20200615_152106.jpg
    IMG_20200615_152106.jpg
    120.1 KB · Views: 93
  • IMG_20200615_152116.jpg
    IMG_20200615_152116.jpg
    113.1 KB · Views: 92
  • IMG_20200615_152341.jpg
    IMG_20200615_152341.jpg
    129.6 KB · Views: 93
  • Manual Replacing procedure.JPG
    Manual Replacing procedure.JPG
    80 KB · Views: 89
  • Page 4-80.JPG
    Page 4-80.JPG
    65.1 KB · Views: 90
  • Page 4-60.JPG
    Page 4-60.JPG
    66.5 KB · Views: 97
  • Page 4-97.JPG
    Page 4-97.JPG
    75.5 KB · Views: 93
  • Unit life indicator.jpg
    Unit life indicator.jpg
    126.6 KB · Views: 96
Joined
Jun 11, 2020
Messages
16
I didn’t find any primary or secondary transfer voltage options in the service manual, but found other three promising options PRT Max Density, PRT Highlight, Background Voltage Margin (The words Text gradation and foggy background catch my eyes) I tried either increasing or decreasing the values and run stabilizer in one case along with them. It didn’t help. I tried different gsm paper types, adjusting ATDC Levels, in Color Balance Settings the Saturation, Brightness Contrast, Sharpness. Neither of these options made significant/recognizable changes to the problem.
 
Joined
Jun 11, 2020
Messages
16
The unit is working. Even though it has quality issues we cans till use it for probably half of the things it was intended for. It still worth me to sped 100-200 euros for parts, but I need more information which ones to order.
 
Joined
Jun 11, 2020
Messages
16
Somebody from another forum mentioned a test which I will to try out.
Basically he suggests intentionally interrupting the printing process. The toner stays on the drums and belt, this way I can (hopefully) check where the blur occurs.
By the way yesterday I finally figured out how to remove the belt unit (but I don’t want to talk about it…) so now I can do this test. (Also I cleaned it, but it doesn’t help)
Anyway…
If I measure the time between the intake of the paper (from the side feeder) and the output of finished print, the procedure lasts 10-11 seconds, so I will try to cut out the power somewhere in the middle.
I’ll be back.
 
Joined
Jun 11, 2020
Messages
16
The interrupt test results:
The blur is already present on the drums. So, does it can mean that the drums worn out simultaneously? Or something even before that can cause this? What do you think?
 

Attachments

  • CMYK - Custom Test page - original.pdf
    36.8 KB · Views: 80
  • Belt 1.jpg
    Belt 1.jpg
    144.1 KB · Views: 94
  • Belt 2.jpg
    Belt 2.jpg
    137.2 KB · Views: 98
  • OPC Drum C 1.jpg
    OPC Drum C 1.jpg
    127.5 KB · Views: 89
  • OPC Drum C 2.jpg
    OPC Drum C 2.jpg
    128.2 KB · Views: 86
  • OPC Drum K 1.jpg
    OPC Drum K 1.jpg
    143.1 KB · Views: 86
  • OPC Drum K 2.jpg
    OPC Drum K 2.jpg
    141 KB · Views: 96
  • OPC Drum M 1.jpg
    OPC Drum M 1.jpg
    114.5 KB · Views: 88
  • OPC Drum M 2.jpg
    OPC Drum M 2.jpg
    133.6 KB · Views: 92
  • OPC Drum Y.jpg
    OPC Drum Y.jpg
    107.3 KB · Views: 95
Joined
Jun 11, 2020
Messages
16
an additional thing

I was not convinced about interchangeability between the drums of the different colors so I tried it out.
The dimensions are the same so I changed the yellow drum with the black and in the end it still works. And it seems that it has no effects on the quality of the prints.
Also the fact that no error message appeared after I turned on tells me that the drums are not under the supervision of the control chips (which I guessed after I disassembled the imaging units).
And I guess the same applies to the belt in the image transfer unit.
So the question still stays.

What all this test tells so far?
 
Joined
Jun 11, 2020
Messages
16
You gonna… smear your… underwear! (or make a facepalm)
Because I found the problem and also the solution!

I was searching for parts for imaging units to order one set to sort out the possible problem.
I made a list but before the order I decided to make every possible maintenance what is written on the troubleshoot pages and every maintenance on the web, which mentions blur and applies for my unit.
I done two things:
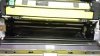
1. I cleaned the LED assy lens.
This maintenance is actually mentioned in the service manual and in this YT video. So I did it according them.
2. I cleaned the electrostatic charger wire (At least I think so):
In the previously mentioned video the lady also fiddles with the some white plastic sticks under the toners.
I did the same on my unit. I am not sure that they are the same thing in my case because the sticks in my unit haves different shape, color and they are a part of the imaging units.
The service manual didn’t mention any “electrostatic charger wire” only some “charge corona” so I dint know about it.

I don’t know which of these helped but the blur almost totally disappeared! Just the cyan makes still a little blur, so I give him another two cleaning strokes but that didn’t help anymore.

I never did this cleanings before. Firstly because I didn’t know about them, secondly because even after I uploaded the troubleshoot pages which ones mentioned blur, nobody suggested that possibility and thirdly… I never imagined that the previous owner would miss a simple thing, such as a non-invasive cleaning process.

Probably I will have to repair/change the LED for the cyan in LPH assy (or the charger wire/corona) in the future but for now, I am fine with it!

The blur was present from the beginning. I bought this unit this way in the hope that I will figure out how to repair it (just like with every used broken electronic I bought). The last owner told me (as he remembered) it slowly developed the blur, and then they lost the patience to maintain it further and put it in the heated archive/storage where it stayed 2 years.

I got some items along with it when I bought it:
1 used waste toner bottle
1 used paper dust remover (I think)
1 new ozone filter
1 used deodorant filter (I think)
1 nearly empty yellow cartridge
2 full/new black cartridges

I checked the local markets for compatible used/broken unit selling for parts. No interesting listing currently.

Hopefully I can squeeze out of it 100000-150000 pages before I will have to replace something (probably the first things will be ozone filter, dust remover or transfer roller) but before that I will probably change the LED or wire of cyan color after all, if any of those causing the remaining blur and if can find any compatible parts. Sadly I didn’t find any replacements for those so far.
So far found replacement for drums here an here as a 5 piece bundle, chips, belts (which I am not sure about the compatibility currently). Also found an image transfer unit for 280 but I like the idea more where I have to replace just the belt. Just have find a compatible one or figure out which models using the same belt.

Anyway, the mystery of the blur is solved for now. I hope this topic will helpful for others also. Probably I will return to this topic time to time.

Thank you guy for all the help/time you spent for helping me. If you visit our county says hi! I pay a round :D
 

Attachments

  • CMYK - Custom Test page - original.jpg
    CMYK - Custom Test page - original.jpg
    119.3 KB · Views: 90
  • CMYK - Custom Test page - print - After cleaning of LED assy lens.jpg
    CMYK - Custom Test page - print - After cleaning of LED assy lens.jpg
    114.9 KB · Views: 96
  • Picture 2 - original.jpg
    Picture 2 - original.jpg
    176.3 KB · Views: 96
  • Picture 2 - print - After cleaning of LED assy lens.jpg
    Picture 2 - print - After cleaning of LED assy lens.jpg
    163.7 KB · Views: 91

Ask a Question

Want to reply to this thread or ask your own question?

You'll need to choose a username for the site, which only take a couple of moments. After that, you can post your question and our members will help you out.

Ask a Question

Top